Installation tips and jointing procedures
The solvent cement operates by chemically softening the outside of the pipe and the inside of the fitting. Joint integrity is greatly reduced if these surfaces are not absolutely clean and properly prepared.
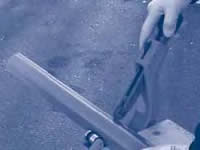 |
1. The pipe must be cut clean and square. A suitable wheel cutter will eliminate swarf. A saw may be used, however this will create dust which may enter the pipework system. |
 |
2. File a chamfer, approximately 3mm x 45°. This prevents the solvent cement layer being scraped from the surface of the fitting when the joint is assembled. |
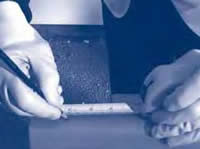 |
3. Mark the pipe a known distance from the end and clear of the area to be abraded. This should be used to check the pipe penetration into the socket after assembly. 4. Thoroughly abrade the end of the pipe over a length equal to depth of the fitting socket, using clean coarse emery cloth. |
 |
5. Thoroughly abrade the inside surface of the fitting socket. 6. Clean thoroughly the abraded surfaces of pipe and fittings using a clean, lint free cloth or paper towel, moistened with Astore Eco-cleaner. |
 |
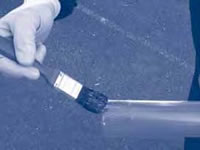
7. Using a clean brush, apply the Astore solvent cement to the pipe and fitting using longitudinal strokes. The abraded areas should be completely covered with the cement. The amount required will vary with pipe diameter and the fit between pipe and fitting, but should be such in all cases that the cement is still liquid when pipe and fitting are assembled. It is important to apply cement quickly, to enable assembly without excessive force being required. |
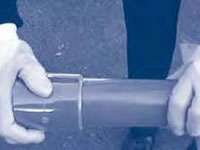 |
8. Immediately after application of cement, push pipe fully home into fitting. Do not twist. Hold pipe & fitting for times varying from a few seconds on sizes 3/8″ to 1 min. on sizes 8″ and above. Application of correct amount of cement will result in a neat bead at edge of fitting & pipe. Excessive deposits inside fittings must be avoided as these can weaken wall, particularly on small sizes. When working in cold conditions ensure joints are free from frost & moisture & allow extra curing time to compensate for lower temp. |
 |
9. Wipe off excess cement from outside of joint. Joint drying timed vary with fit, amount of solvent cement applied, ambient temp. & working pressure. It’s recommended that when possible, joints are cured for 24hrs before test pressure is applied. However, we recognise there will be times when joints need to be put into service within a few hours of being made. A rough but safe working guide (where contents temp. will not exceed 20°C) is 1hr per bar for systems up to 4″. For larger sizes increase time to 1.5hrs. In any event allow joints to cure for min. 4hrs. |
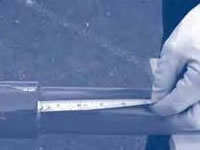 |
10. Immediately Using the mark previously made, check that the pipe has been fully inserted. 11. Do not disturb the joint for at least 10 minutes after assembly. On larger sizes do not subject the joint to bending or twisting forces for at least 4 hours (see below). When making subsequent joints, which can be done without waiting, take care not to transmit forces to freshly made joints in the system. Allow sufficient drying time prior to pressurisation of the system hours. 12. Replace lids on containers. |
CAUTION
- DO NOT use near naked flames
- DO NOT smoke in the working area
- DO NOT use in confined spaces
- DO NOT joint in the rain or wet conditions
- DO NOT use dirty brushes
- DO NOT use dirty or oily cleaning cloths
- DO NOT use the same brushes for different cements
- DO NOT dilute or decant Astore ABS solvent cement
- Follow safety instructions on Astore solvent cement and Eco-cleaner containers
- Always wear appropriate personal protective equipment
Notes
1. The integrity of Astore ABS systems may be affected if Astore ABS solvent cement and Astore Eco-cleaner are not used. Astore disclaims responsibility for any Astore ABS system constructed with any other cement or not fabricated in accordance with the instructions herein.
2. To achieve the correct speed of application on sizes 5″/140mm and above, cement should be applied simultaneously to pipe and fitting, by two people.
Drying Times
The drying times will vary with fit, amount of solvent cement applied, ambient temperature and working pressure. It is recommended that, wherever possible, joints of sizes up to 8″/225mm are allowed to dry for at least 24 hours, and sizes 10″ and 12″/250mm and 315mm for at least 48 hours. These guidelines are based on an ambient temperature of between 10°C to 40°C. Longer drying times will be required at lower and higher ambient temperatures.
It is recognised that there will be occasions when the system will need to be put into service within a few hours of being made. A rough but safe working guide where the ambient temperature is between 10°C to 40°C and the contents temperature does not exceed 20°C is as follows:
| Size range | Up to 2.5″ / 75mm | 3″ to 4″ / 90mm to 125mm |
5″ & 6″ / 140mm & 160mm |
8″ / 200mm & 225mm |
10″ & 12″ / 250mm & 315mm |
| Drying time ABS | 0.5 hour / bar | 1.0 hour / bar | 1.5 hours / bar | 2.0 hours / bar | 48 hours min. |
| Drying time PVC-U | 1.0 hour / bar | 1.0 hour / bar | 1.5 hours / bar | 2.0 hours / bar | 30 hours min. |
Note – minimum drying period should never be less than 1 hour.
An indication of the number of joints to be made per litre of cement is as follows:
| Size mm | Size inch | Recommended container size |
Joints per litre ABS |
Joints per litre PVC-U |
| 16 – 32 | 3/8 – 1 | 0.5 litre | 400 | 300 |
| 40 – 63 | 1 1/4 – 2 | 0.5 litre | 200 | 120 |
| 75 – 110 | 2 1/2 – 4 | 0.5 litre | 70 | 50 |
| 125 – 140 | 5 | 1 litre | 20 | 15 |
| 160 – 225 | 6 – 8 | 1 litre | 10 | 8 |
| 250 – 315 | 10 – 12 | 1litre | 5 | 3 |
Chemically Resistant PVC-U Cement
For PVC-U applications with the following chemicals we recommend the use of HCR-36 (Product code R PCO.0100) a chemically resistant version of our Astore PVC-U cement. Always use the appropriate cleaner (Product code M CFO.0100) when using this chemical resistant cement.
| Sulphuric acid | concentration higher than 70% |
| Hydrochloric acid | concentration higher than 25% |
| Nitric acid | concentration higher than 20% |
| Hydroflouric acid | each concentration |
| Sodium hypochlorite | active chlorine higher than 7.5% |
| Lyes, bases (caustic soda) | concentration higher than35% |
| Maximum gap 0.3mm |
Maximum pressure |
| 20°C | 12 bar |
| 50°C | 6 bar |
| 60°C | 4.5 bar |
| 80°C | 1.5 bar |
Maximum pressure depends also on the pipe system used and PN class.